Maybe its a side effect of Pinterest, and all of the beautiful weddings we keep seeing pop up, but with June being one of the busiest months of wedding season, we couldn’t help but get into the spirit and explore some DIY wedding ideas using MagCloud products.

Custom Party Invites
It all started last month when I created some fun custom bachelorette invitations for a getaway weekend for my friend who is a bride-to-be. Using MagCloud’s digest pamphlet product I designed a fun little invitation that fit into the top 5.25″ of the template. When the prints arrived (each cost just $0.64) I took a quick snip with my scissors and popped them into coordinating 5.75″ x 5.75″ square envelopes that I found at Paper Source.
Then the idea of creating custom stationary using our digest product got me thinking:
How else could you use MagCloud products for wedding DIYs?

Wedding Programs
Whether you have 12 bridesmaids or 2, having a nice wedding program helps keep guests informed of the order of the ceremony, and who you’ve cast in the important roles for you big day. The four-page digest pamphlet–or if you have a lot going on and want to include songs, readings and hymns–a digest-sized 8-page booklet are classically styled and beautiful printed. We also tried using the square pamphlet for a more modern feel. Depending on the form factor you choose, and the quantity you need, a 4-page digest or square pamphlet could cost somewhere between $0.48 and $0.80 a piece, perfect for the bride on a budget.
Like our modern design? You can download the template for Adobe InDesign below:
- Download the Digest Wedding Program Template (InDesign CS4 and newer)
- Download the Square Wedding Program Template (InDesign CS4 and newer)
Wedding Menus

Using our flyer product to create a sleek menu was really simple too. By dividing the page lengthwise (basically creating a 0.5″ gutter right down the middle of the page) we were able to print two menus per flyer and simply cut them in half with a paper cutter when they arrive.
Because our flyers cost just $0.40 print (or buy at least 20 and the price drops to $0.30/print), printing two per page makes them$0.15-0.20 per menu. That means you could print 200 menus for just $30.00 + shipping.
*Note: Flyer publication orders are subject to an 8 quantity minimum in multiples of 4.
Wedding Poster

The wedding poster seems to have surpassed traditional guestbooks in recent years as the popular way to commemorate one’s wedding day. Rather than being stuffed into a box and never looked at again, the wedding poster allows newly-wed couples to enjoy the love notes and encouragement given to them by family and friends for years to come.
MagCloud’s 12″ x 18″ poster costs just $2, leaving you plenty to spare for a fancy frame. We recommend having your loved ones sign a mat (like this one available from Amazon) rather than directly onto the poster (UV coating which protects the poster, also makes some inks smudge). But if you really want to let folks sign right onto your print, we found that you can do so with Sharpie Metallic Fine Point Permanent Markers.
Get started creating your own! For more design guidelines for our poster product, visit our Getting Started page.
Banners and Pennants
With the “Rustic Chic” style of weddings still ever-popular– pennant or flag signs have become a wedding or shower must-have. We’ve seen every variation from “she said yes” to the classic “Bride” and “Groom” signs on the backs of chairs, and found that the MagCloud standard pamphlet is a great tool for creating your own. With two letters per pamphlet we were able to create this sign for just $6.40. Using fishing line, twine or a narrow strip of ribbon and a glue stick, we simply cut out the pennants, lined the ribbon up in the fold of the paper, and glued the two sides together around it. The 100# cover stock used in our pamphlet product helped the banner hold up in a nice afternoon breeze.
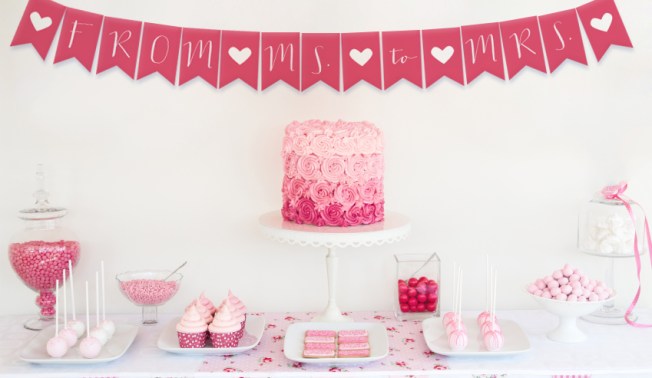
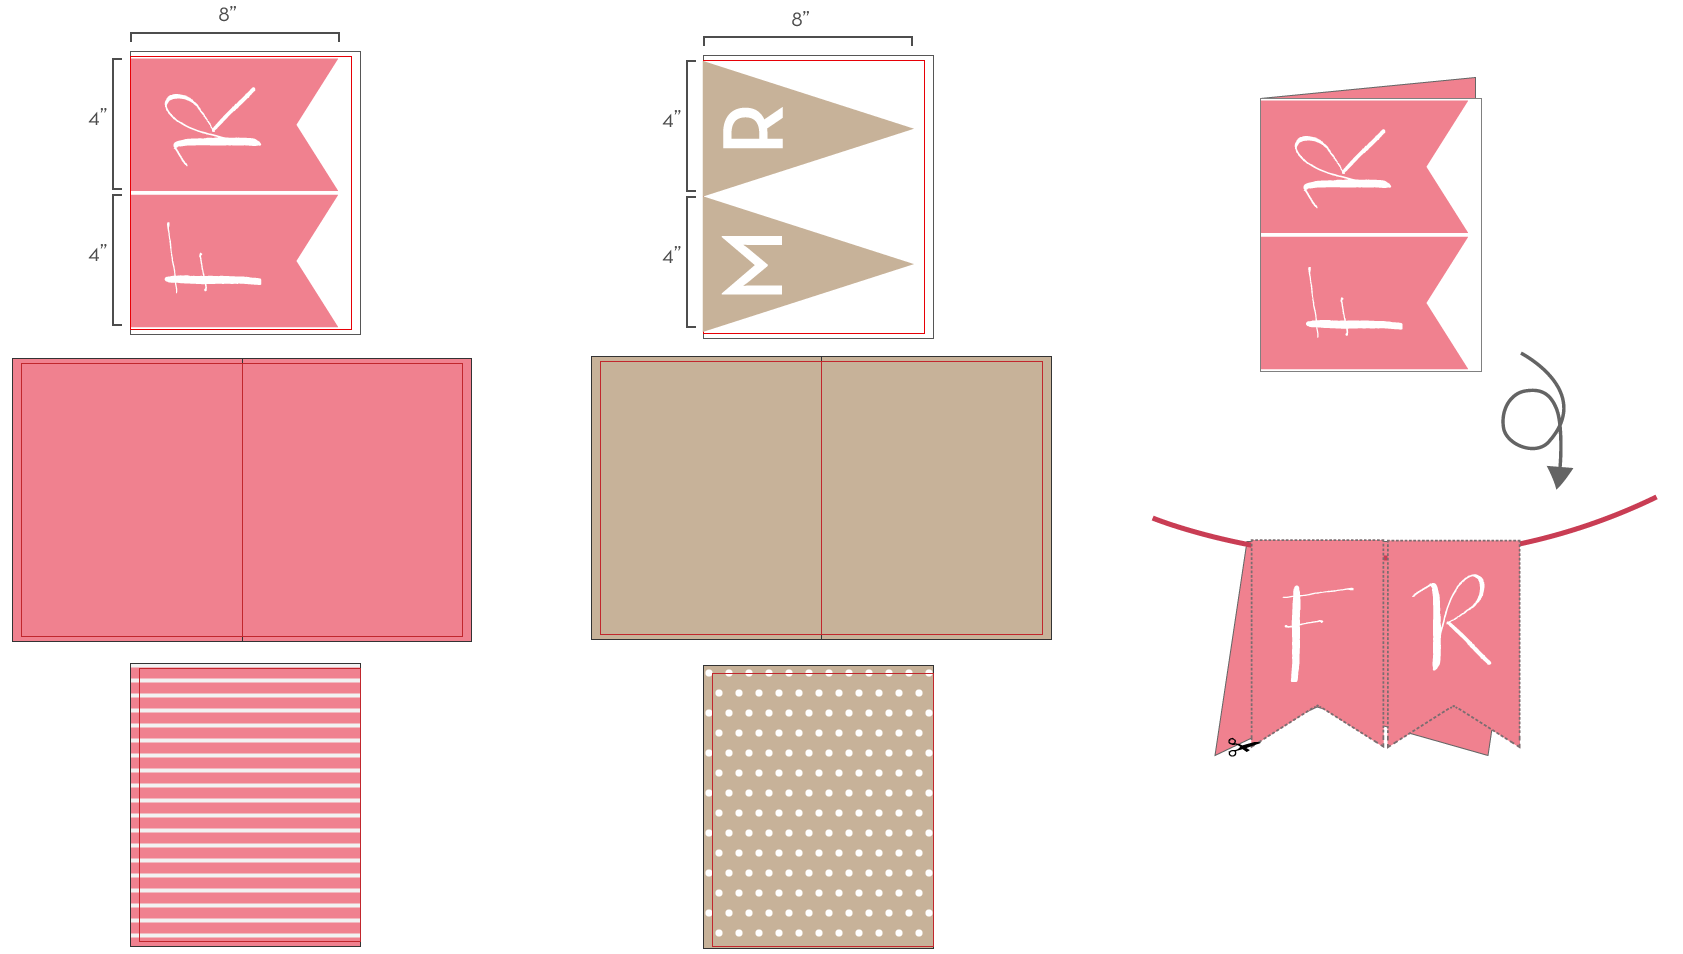 To create your own banner, each pair of letters will need to be designed as it’s own 4-page pamphlet. We used the standard size, 8.25 x 10.75 publication so that we could get 4″ x 8″ pennants. In order to be sure the pennants look great from all sides, we set the full inside “spread” of the document to be a matching color to the outsides (this hides trimming/gluing errors) and to add a little bit of fun, we added a pattern, like stripes or polka dots, to the back sides for when the banner is blowing in a breeze. For the space between words, we used a heart symbol, so the banner would read “FROM❤MS.❤TO❤MRS.” or “SHE♥SAID♥YES.”
Try it and Save
Interested in creating your own event DIY with MagCloud?
Use promo code MCDIY when you publish and save 15%. Valid through June 30, 2013
More Wedding Reading on MagCloud
Now that you’re in the wedding mood, check out some of our favorite publications in the Brides & Weddings Section of the MagCloud Shop.


 For an 8″ x 8″ MagCloud publication, select your Book Settings to match those shown to the right. Specifically:
 For a 12″ x 12″ MagCloud publication, select your settings to match those shown to the right. Specifically:
 One option for adding pages is to choose a Preset under the Auto Layout section, and click the Auto Layout button. This will automatically add pages to your book and layout all the photos from the collection you have selected based on the Preset you specified. This is a great way to get a book laid out very quickly, but all of your page layouts will be the same. If you want to change any of your page layouts after using the Auto Layout function, you can always do so by selecting the page and choosing a different layout from the Page section.
 When you have finished laying out your content, click the Export Book to PDF button in the bottom right-hand corner of your screen. Select a name for your PDF, and choose where you want it to be saved on your computer. After you click the Save button, you can track the progress of your PDF in the upper left-hand corner of the screen. Lightroom will export two PDFs: one that is a single page and has “Cover” added to the filename and another that is a multi-page PDF. For creating a MagCloud publication, you can disregard the cover PDF, and just upload the multi-page PDF to the
  When selecting your layouts and choosing images, it’s good to keep in mind how your PDF will be trimmed by MagCloud. The Lightroom layouts all have a pretty good margin around them, so there shouldn’t be an issue with keeping content inside the MagCloud-recommended safe zone.


 My name is Mike Lesnick, I am the owner and photographer of Mike Lesnick Photography. I use MagCloud to make my brochure/portfolio available to all past and future clients. It’s a great way for me to have my information readily available to everyone.
 We recently highlighted ways

 I love when January comes and I can take a moment to dream up new strategies for my small business in the coming year. For 2012, I made a decision to crank things up a notch with a new creative marketing strategy for my wedding photography business, which had previously been promoted solely “word of mouth.” I had used MagCloud before and knew that it offered an excellent solution to get started with a custom-designed, high impact product that I could print affordably enough to leave after meetings with wedding coordinators, and even send to begin a dialogue and make a lasting impression with potential clients.


