Dan Milnor: Mirrorless Vs DSLR Cameras

Before diving into the similarities and differences between mirrorless and DSLR cameras (and how to choose), let’s take a step back. Looking at the history of photography even briefly can help us understand the camera technology that came along with it. When I think back to cameras of old, my mind goes mostly to the 35mm and the long legacy and style of photograph that this format brought to the world. Sure, things like the Daguerreotype paved the way, but my mind always goes straight to 35mm.

The 35mm Camera – Then and Now

In early 35mm camera history, you can’t overlook two brands: Leica and Nikon. Leica brought the world the first commercially available 35mm camera with the Leica 1, which began selling to the public in 1925. Leica followed with a legendary series of cameras that continues to this day. Nikon followed in 1948 with the Model 1 which led the way to the legendary Nikon F series of cameras. As a young photographer, I was enamored by the men and women covering the war in Vietnam. Seeing still photographs of these journalists flying into battle with their Nikons and Leicas, let alone seeing their subsequent photographs, was what made me decide to become a photographer.

The late 1990s brought the digital revolution to photography and with this revolution came massive changes to camera technology. Out went the film camera and in came digital. With changes in technology came changes in brand. Kodak, long considered the top brand in analog technology, actually pioneered the invention of digital photography. Leica and Nikon were still major players but were suddenly greeted by digital-savvy brands like Canon, Ricoh, Sony, Fujifilm, Panasonic, and many more. Photography once considered difficult and for an exclusive crowd suddenly became viable for the masses.

Mirrorless vs. DSLR Cameras

Mirrorless vsDSLR Cameras

Today we are still seeing serious change in camera technology. But for the average consumer there are two basic camera choices, the DSLR and the mirrorless camera. The DSLR combines the same mechanisms of the single-lens reflex film camera, including the mirror, but instead of film the camera utilizes a digital sensor. The mirrorless camera is as it sounds, a camera without a reflex mirror. So, what is the best option? Why would someone choose one over the other?

Camera Size & Weight

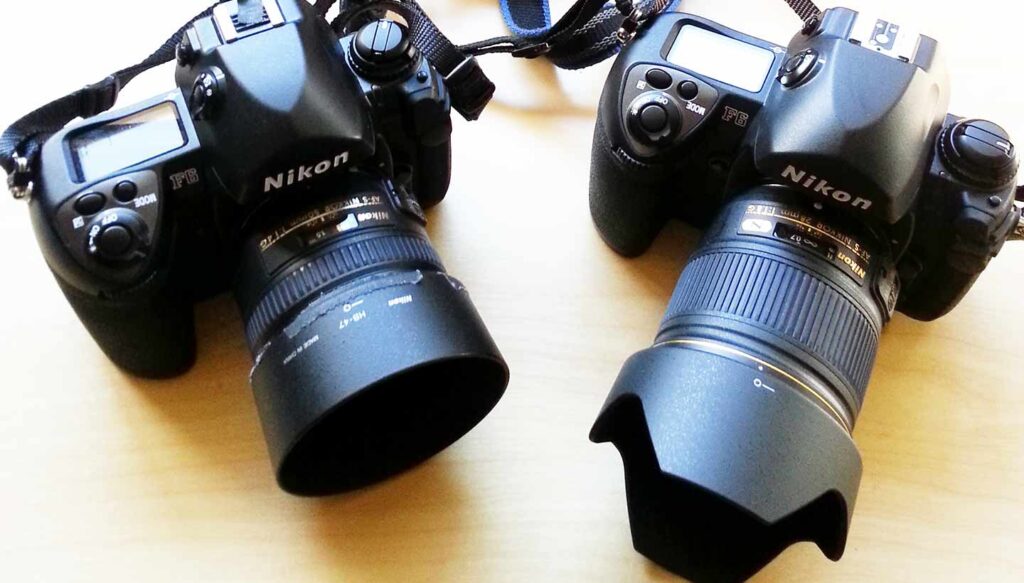
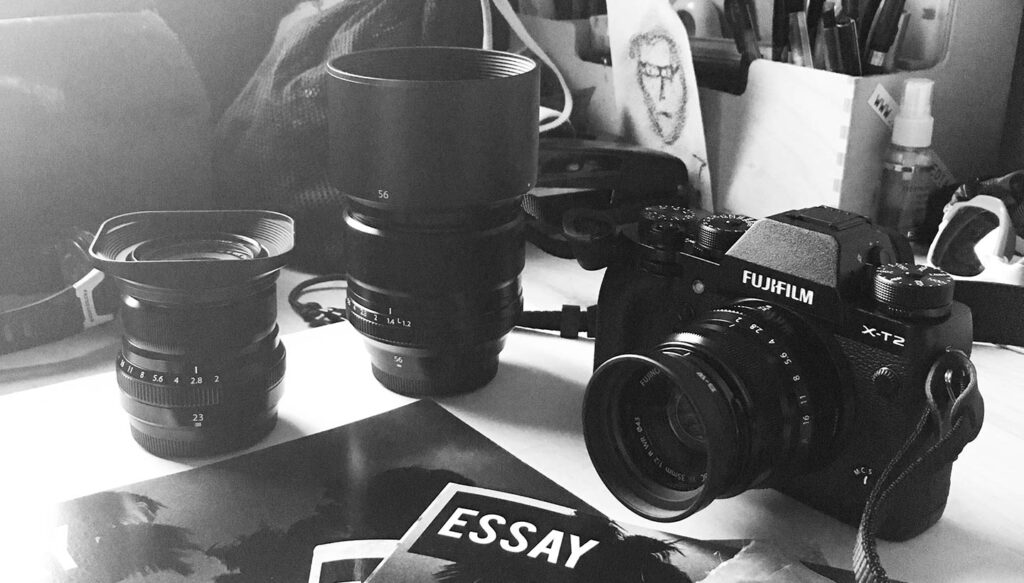
First off, let’s talk size and weight. Due to the DSLR requiring the use of a reflex-mirror, it is noticeably larger than a mirrorless camera. Consequently, DSLRs tend to be bulkier and heavier. Now, you might think this is the end of the story, but it’s not. In terms of capability, you won’t find a more robust photography system than the DSLR. Remember, the mirrorless digital camera is a relatively recent invention. The DSLR has been around for a long time and brands have entire systems in place revolving around their flagship DSLRs. This is changing rapidly as companies invest more heavily in mirrorless technology, but the fact that the DSLR camera is larger shouldn’t limit your decision making.

Functions & Features

Next up is the performance of these systems through aspects like autofocus, image preview, image stabilization, image quality, shooting speed, battery life, lens options, and durability. Early on, the DSLR camera held distinct advantages over the mirrorless camera in nearly every category. The DSLR was tried and true and the mirrorless camera was the new kid on the block. How things change. Due to the decrease in camera size, and rapid advances in technology, feature sets, and capability, photographers began to quickly gravitate to the mirrorless camera just a few short years ago. And yes, even professionals are using mirrorless cameras on a daily basis.

Mirrorless vs. DSLR Cameras
Autofocus, Image Preview & Shooting Speed

In terms of autofocus capability, both systems now offer world-class speed. Focus tracking, eye tracking, and multi-point autofocus are par for the course. It is rare to hear anyone complain about autofocus speed. Image preview is much the same on both systems, but there have been changes to the features and capability of the preview screen itself. Flip-out screens and touch capability are now commonplace. Shooting speed is also consistently good across both platforms.

Stabilization, Video & Image Quality

Stabilization is another feature offered by both systems and at the highest level, with stabilizing features now being built into both camera and lens. In terms of video and still photo quality, both the DSLR and the mirrorless options offer massive sensors and file sizes with motion footage up to 4k and beyond.

Battery Life

The nod to battery life would still go to the DSLR. When there’s a larger camera structure to work with, it’s possible to include a larger battery. But even though mirrorless cameras are playing catch up when it comes to batteries, the improvements over the past year have been remarkable. I recently upgraded to a new camera and was amazed at the improvement in battery life.

Lenses & Durability

If I had to tip the scale in one direction or another for these categories, I would give a slight nod to the DSLR. Again, the DSLR has been around for a much longer time than the mirrorless, so these pioneering camera systems are incredibly well designed and well thought out. But the differences are fractional at best. I have been using mirrorless cameras for the past three years and have never had a single failure.

The Big Picture

One question I hear a lot is “Will mirrorless cameras replace the DSLR?” The truth is, I don’t know. Market demand tends to be what makes these decisions for us. I can say from personal experience that my move from DSLR to mirrorless has been seamless and wonderful in every way. Camera size is very important to me, so the mirrorless fits my lifestyle and my needs nicely. I’ve learned to live with things like shorter battery life and fewer lens options, but I can say with certainty that these realities have never impacted my work in a negative way.

Over the past three decades I’ve been asked thousands of times, “Which camera should I buy?” My answer might surprise you. Buy what you will carry, and buy what makes you excited enough to go make pictures. Whatever brand, DSLR or mirrorless, is somewhat irrelevant. What matters is pointing your camera out and into the world.

11 Tips for Photographing Spring

Spring is an exciting time to have your camera in hand. The natural world is in bloom, so you can look forward to more daylight hours, warmer temperatures, and even a brighter outlook! Use the change in seasons to get inspired, explore new photography subjects, and enjoy a fresh perspective. 

Here are some spring photo tips to guide you as you venture out into the world. 

1. Tell a Color Story  

It’s a vibrant world in March, April, and May! Natural landscapes and city streets are alive with color—from flowers to fashion trends—so follow those hues. Add a pop of color to your photos. Seek out bright patterns and textures to use as a backdrop or fill part of your photo. You can even create a series of pictures using a single color as your inspiration. 

2. Try New Techniques 

Springtime is all about new beginnings, so apply the same approach to your photography practice. Take a new lens out for a spin, or experiment with manual settings on your camera. Try a new photography technique you’ve read about, like long exposures or bracketing images. 

3. Light the Way 

No matter what you photograph, good lighting is essential. Use the intensity of the light and how it interacts with your subject to tell a visual story. Soft light at dawn or dusk creates a quieter, serene mood, while strong, midday sun can have you battling harsh shadows and blown out highlights. A dramatic, backlit image can be effective as long as you plan for it. So give yourself time to experiment and find the best lighting for each photo. 

4. Find Symbols of Spring 

Choosing a theme can be just the motivation you need to start a new photo project. Step outdoors and have fun capturing all the classic symbols of spring. Blossoming trees and flowers, bright umbrellas and galoshes, rainbows, birds and other wildlife can renew your curiosity and creativity behind the camera. 

5. Follow the Activity 

It’s a bustling time of year as people and animals emerge from their winter slumber, so notice where everyone gravitates on warm spring days and go there! The season is also full of social events and celebrations (graduations, weddings, parties). If you’re visiting family and friends, bring your camera so you can photograph people dancing, kids playing, frisbees flying, and pets on the go. 

6. Get a Fresh Perspective 

Spring is a time of transition, so why not change things up? Instead of taking photos at eye level, try different vantage points. Get down low to capture bright blooms and sprouting foliage in a garden, then turn your lens upward and try framing clouds, trees, skylines, or buildings in unexpected ways. Mix up your approach to portraits too!

7. Add a Sun Flare 

Usually you want to prevent strong glare in photos because it can detract from the subject. As a spring challenge, see what happens when you let a sun flare take center stage. Using a smaller aperture will produce stronger, more defined flares, while wide open apertures will soften the glow. As you compose the shot, see how other objects (branches, windows, lakes) play into the shot. 

8. Focus on Flowers 

Sometimes photographers need to stop and smell the flowers. Pull out your macro lens or use the macro setting on your camera to take some close-ups in the garden. If you’ve never used a macro lens, this can be a huge game-changer as you explore colors, details, and textures in a whole new way. 

9. Go with the Flow 

Rain showers come and go as they please in spring, so there’s no sense in trying to fight them. Use the weather changes to experiment with light, contrast, movement, and even blur. Notice the dramatic shift in colors and lighting as clouds roll in, follow people and objects caught in a sudden burst of wind, or play with reflections in puddles. 

10. Pick an Observation Spot 

Just as you can learn a lot by shooting photos on the go, you can also discover new things if you stay in one spot and focus on your surroundings. Pick a park bench or a café on a busy street, and see which subjects catch your eye. If you usually take photo walks with a specific goal in mind, this is a way to open up your creative practice and find beauty in stillness. 

11. Start Early or Stay Up Late 

When is the last time you woke up early to photograph a sunrise or stayed up late to do long exposures of the night sky? Use the longer days of spring to extend your photo shoots and think outside your normal routine. This will also give you a chance to adjust your camera settings and learn about different qualities and challenges of daytime or nighttime lighting.   

Once you have a collection of new images on your camera roll, you can start editing them and planning your next print piece.

MagCloud: More than just magazine

MTMheader

I first heard about Magcloud in a hotel lobby in Atlanta during a photography conference. A young photographer created a serial portfolio of sorts using the Magcloud magazine, and when he placed the publication on the table in front of me my first thought was “That is a real magazine.” I was instantly hooked, flew home and built my own Magcloud series. For those of you who don’t know, or those who didn’t grow up thinking about photography, the magazine holds a special place in the heart of most image-makers. As young photographers we dreamt of seeing our images on the pages of the big magazines. A cover was beyond comprehension.

Over the years I’ve made many different Magcloud magazines. I’ve created issues to sell, others to promote and others for fun, but Magcloud is far more than magazine. The platform offers a diverse range of publication from the flyer and pamphlet size piece to a wire-bound, 11×14 tabloid style publication and even a poster if I find the need. They also make two of my all time favorite trim sizes. The digest, a 5.25×8.25 in portrait or landscape, as well as an 8×8 square. As a storyteller, retired journalist and residual photographer these two pieces, combined with magazine, keep me very, very happy.

MTMshifter

Digest is the perfect size for a mailer or promotional piece, but also plenty nice enough for a small run, art publication or something to sell as a compliment to a larger book or magazine. The one you see here details my website and the range of work you would find if you visited the site. I buy stacks of these then hand them out to people I find inspiring or those I want to collaborate with.

The 8×8 square is a perfect, modern format. I don’t know about you, but the vast majority of images I make with my mobile phone are in the square format. Plus, I’m still a diehard Hasselblad user, so all my portrait work is square format, which lends itself perfectly to the 8×8.

Both of these formats offer saddle stich or perfect bind, discounts for volume and both domestic and international shipping. And remember, with print-on-demand you only need to order one at a time, so experiment, test, tinker and see what format fits you best.

-Dan Milnor

MTMbook

Why I like Magazine

Not that you were asking but I’m going to share my magazine thoughts with you…again. Why? First, I’m amazed at how many people don’t know we make a magazine. Second, this format is SO unique in how it looks, how it can be designed and what it means to those who receive it. And third, there are SO MANY people who have the drive and talent to be publishing their own. How do I know? Because I did it. On a small scale mind you. I shot, edited, sequenced and designed a short run magazine, back in like 2009, and sold my allotted number.(100) And I’m pretty sure I could have sold a lot more.

1

Now, am I going to support myself on magazine sales? Probably not, but I will tell you within a week of “announcing” I was going to do this I was getting calls from people who wanted to advertise. I ended up not doing any advertising, didn’t really need it, but had I chosen to go down that route I think I could have managed it. The magazine has ALWAYS been one of the Holy Grails to documentary style photographers, going back to the days of Look and Life. HOWEVER, all of this died back in the mid 1990’s, and yet many of us are still pretending like these magazines are the keys to “getting work out.” Please. They aren’t, and they haven’t been for a long, long while, but the magazine is still very alluring because of what it means.

2

First, it’s designed to be discarded, in most cases that is. We all have friends who have every copy of National Geographic or Rolling Stone or Off-Road Buckshot Mudder….come on people I grew up country. To some the magazine is SACRED ground. Most people get a magazine, read it, leave it around until they look at it and ask “Why am I keeping these?” then toss them out. But why? BECAUSE THEY KNOW ANOTHER ISSUE IS ON THE WAY. People this is so fantastic. Ever thought about a subscription list? A simple email database of those who want in? How easy is that to compile? Wait for it….I’m doing this precise thing. Stay tuned for a subsequent post.

3

Also, magazines are informal in comparison to books. They are treated differently, taken poolside, used to mop up the puke of sick kids and probably still read, but I would need independent verification from you parents out there. Magazines travel. They are given away. My wife gives her’s away on airplanes. “Hey, wanna read this?” she asks and they are ALWAYS taken. Try giving a book away on a plane. It might work but people might think you are creepy too. And for all I know you ARE creepy. You’re here aren’t you?

4

These last two spreads are from a new project, Whistleblower, which is a look at the modern surveillance culture and the changing terminology of modern warfare. The images were made in various places around the world.

In a way this was a trial run. Just another test in a long, long line of tests. I made mistakes, even after proofing so many times I almost threw up. It happens. To everyone. Don’t sweat it. Correct and move on. Live and learn. Enjoy. When I see this magazine I think to myself, “What are the limits here, the possibilities?” and what comes back at me is…..there aren’t any. What are we waiting for? Permission? An editor to assign something then embargo the work after running ONE image? If you are a wedding photographer why not run a quarterly run of your best images which then goes out to your top vendors, planners and former clients, via print or “E?” If you are a editorial photographer why not run an issue on what didn’t run via mainstream channels? If you are an amateur who shoots for fun why not do a run for your family to keep them up on what is turning you on in the visual world?

We all need to get hip and get hip NOW. This isn’t 1975, or 1985 or 1995 or even 2005. This is a blank slate. A playing field where everyone gets in the game.

Cooking-up a Recipe Book with MagCloud

It’s that time of the year, which means it’s time to start thinking about gifts…

I used to spend 3 days making dozens of batches of home-made biscotti to give to the neighbors and friends who unexpectedly drop by during the holiday season.

But this year? Well, let’s face it–I’m too busy to spend 3 days baking, packaging and crafting these little masterpieces.

Instead, I have decided (Sorry friends, your surprise is ruined!) to give my loved ones and neighbors a custom cookbook, filled with our family favorites, printed by MagCloud.

Today I will share with you a template that I have made in InDesign and a few tricks for customizing it for your own use.

GETTING STARTED:

You can start with my custom-designed template that is already formatted for MagCloud settings, or create one of your own. MagCloud’s InDesign document settings and a blank template are available at magcloud.com/help/indesign

Download my InDesign Template.
Preview my cookbook on MagCloud.

CUSTOMIZING YOUR TEMPLATE:
Transforming this template into something of your own is pretty simple using style sheets. Before you start entering your own information, I suggest your go through the template and adjust the colors and fonts to your choosing.

Change your Spot Color
1. Open the Swatches Panel
In CS6 or higher click Window > Color > Swatches
2. Double Click on the color named “sweet red”
3. Adjusting the C,M,Y and K values will change the “pop of color” on all of the pages where it is used in the template.

Adjusting Paragraph Style Sheets
Open the Paragraph Style Panel.
In CS6 or higher click Window > Styles > Paragraph Styles.

Once you have the Paragraph Styles Panel open, you can then go through the document and change your fonts and colors. You will notice that the style sheets are divided into subcategories based on where they are in the document.  (Tip: by opening up all of these sub-tabs you can easily see what style affects each block of text you select on the page)

To adjust the settings of your paragraph styles:
1. Select the text you want to change
2. Identify which Paragraph Style you are selecting within the Paragraph Styles Panel
3. “Right Click” or “Ctrl + Click” on the highlighted style in the Paragraph Styles Panel
4. Using the Paragraph Style Options Dialog box, adjust the font details

Add Your Own Photos and Personal Touches
Change the title, insert photos, recipes and update the intro letter to reflect your own personal style. You can even include a photo of the person who gave you the recipe or a special quote from them.

(Tip: to include more recipes select a “spread”–2 side-by-side pages–within the Pages Panel, and [ctrl + “click”] or [“Right Click”] on the highlighted pages within the panel. Select “Duplicate Spread,” this will insert a set of identical pages in your document.)

**Note that you will want to have a page count that is an increment of 4 pages to print with MagCloud… such as 16… 20… 24… 28… You get the idea!

SAVE AND EXPORT A PDF:
Want a quick easy way to be sure your export settings are correct?

DOWNLOAD the MagCloud PDF Export Job Options file

*If you are on a Mac: double click on the file, it will open in an Adobe application and add it to your presets. You can then close that application and return to InDesign.

*If you are on a PC, within InDesign go to File > Adobe PDF Presets > Define > Load
Find and Select the file you downloaded called “MagCloud_PDF_Export” > Click Done

To use these imported settings, with your file open in InDesign,
Select File > PDF Presets > “Adobe PDF Preset for MagCloud”

Name and Save your PDF and you are ready to publish!

Other Fun Ideas for Your Cookbook:
– make your cookbook themed with all family classics or recipes from a particular family member like “Granny’s Favorite Recipes”
– make a genre themed cookbook, like “Sweets,” “Holiday Dishes,” or “Brunch”
– make a cookbook for a school fundraiser and call it “Bake Sale”
– Ask friends to contribute recipes and do a collaborative cookbook

Season’s Greetings Printed by MagCloud

hangingcards_crop

‘Tis the season holiday cards and newsletters, and MagCloud is here to help! As we’ve discussed before, MagCloud’s print-on-demand capabilities offer a great way to produce personalized holiday communications on an affordable budget. With the premium 80# cover stock we use on all sizes of our Flyer and Pamphlet products, combined with the commercial quality of our full-color digital printing, you can rest assured that your message will look professional and polished whether you are keeping in touch with business clients or corresponding with family and friends.

Holiday Newsletters and Cards for Your Business

BizNewsWe have a number of businesses and organizations that use MagCloud for their newsletters year-round, and the holidays are no exception. As we near the end of the year, it’s a great time to connect with clients and members to update them on the prior year and get them thinking about the year to come. If you own a photography business, for example, you can use this as an opportunity to highlight some of your best work from the past year and remind previous customers about the other services you offer. Or if you are in charge of member communications for a nonprofit organization, now is a great time to highlight the work you’ve done in 2012, and encourage member participation in the new year.

No matter what business you are in, MagCloud’s 8.25″ x 10.75″ Pamphlet product is the perfect format for your holiday newsletter with four pages for full color images and text, a clean half-fold binding, and a professional-weight paper stock, all for as low as $0.60 per piece when you order 20 or more. Simply create your PDF in the software of your choice, upload it to MagCloud, and order as few or as many copies as you’d like. We can even take care of the distribution of your newsletter for you, and drop-ship copies of your newsletter to an address list at no additional cost.

Business CardsIf you don’t feel like a long-form newsletter is the right fit for your business, you could also create and send a custom greeting card instead. MagCloud’s 5.25″ x 8.25″ Pamphlet format fits perfectly into A9 envelopes, which can be found at any paper or office supply store, and the 80# cover stock that these products are printed on gives them a great professional feel. For only $0.48 per piece when you order 20 or more, this Pamphlet format offers an affordable way to incorporate your products, employees, or the work that you’ve done into your holiday greetings, along with your own branding and a more personalized message, rather than sending a generic card to your clients or organization members.

Holiday Newsletters and Cards for Your Family

NewslettersOf course, businesses aren’t the only ones that send cards and newsletters during the holiday season. Holiday newsletters from families have become the norm in recent years as a way to update friends and relatives on the family’s activities over the prior year. Combining these updates with family photos into a single printed piece is a great way to streamline your holiday communications, either as a double-sided Flyer or using one of MagCloud’s four-page Pamphlet products for additional space.

Cards FamilyIf a newsletter isn’t your style, how about a custom greeting card. MagCloud’s 5.25″ x 8.25″ Pamphlet product makes great half-fold cards while the 5.5″ x 8.25″ or 8.25″ x 5.25″ Flyer works well as an oversized postcard. Both fit perfectly into A9 envelopes, and at only $0.24 per piece for 20 or more of the Flyers, or $0.48 per piece for 20 or more of the Pamphlets, both offer a blank slate to create affordable holiday greetings that are unique to you and your family. Whether you create a collage of family photos or scan some of your children’s artwork for the cover of your card, you can be sure that it will be met with a smile upon arriving at its destination.

Templates

TemplatesTo help you design your holiday newsletter or greeting card for printing through MagCloud, below are links to templates in a variety of formats and software programs. Each link below will take you to a preview of a publication created with that template on the MagCloud site, where you’ll find links in the description to download the corresponding template for a variety of software programs. You can also find a number of letter-sized newsletter templates in programs like Apple Pages, or online at office.microsoft.com for Microsoft Word and Microsoft Publisher. These work well with MagCloud’s 8.25″ x 10.75″ Pamphlet and Flyer products. After you’ve designed your file, be sure to follow the instructions on our Getting Started page to export your PDF.

4-page Business Newsletter (8.25″ x 10.75″ Pamphlet)

4-page Holiday Newsletter (8.25″ x 10.75″ Pamphlet): Adobe InDesign (CS4 or newer) | Microsoft Word | Apple Pages

2-page Holiday Newsletter (8.25″ x 10.75″ Flyer): Red Design | Blue Design

Left-Folded Holiday Card with One Image (5.25″ x 8.25″ Pamphlet)

Left-Folded Holiday Card with Three Images (5.25″ x 8.25″ Pamphlet)

Top-Folded* Holiday Card with One Image (5.25″ x 8.25″ Pamphlet)

Top-Folded* Holiday Card with Three Images (5.25″ x 8.25″ Pamphlet)

Portrait Flat Holiday Card (5.25″ x 8.25″ Flyer)

Landscape Flat Holiday Card (8.25″ x 5.25″ Flyer)

*Keep in mind that if you are using the 5.25″ x 8.25″ Pamphlet for your greeting card and want a top-fold, you will need to upload a PDF with the design rotated, in the same way you would if you were creating a calendar.

PDF 101: Ten Common PDF Problems

We see a lot of PDFs come through the MagCloud site, and while most of them look great, there are some avoidable issues that pop up every so often. Below are ten common PDF problems that can stand in the way of a great looking print publication.

1. Content is too close to the outside edges.
We see a number of great PDFs that have text placed dangerously close to the trim line.   As we discussed in our design series blog post on trim and bleed, it’s important to keep your content within a safe distance of the trim line to avoid having it cut off in your final print publication. Remember that the trim line is 8.25″ x 10.75″ so you need to design to those dimensions NOT the PDF size of 8.5″ by 11″ that you upload to MagCloud. This 8.5″ x 11″ PDF includes a bleed area that will be trimmed off: 0.125″ on the top, 0.125″ on the bottom and 0.25″ on the outside. Since this trim can vary slightly in either direction, we recommend leaving 1/4 inch of extra space between the 8.25″ x 10.75″ trim line and your content, particularly any text content. This will ensure that even if the trim is slightly off, your content will not get cut off, nor will it appear to have been placed too close to the edge of the page.

2. Images are not extending into the bleed area.
Similarly, we see a lot of PDFs where images that the publisher wanted to extend to the edge of the page stop at the trim line. If the trim is even slightly off in the opposite direction in this case, there will appear to be a thin white edge on the image, as shown in our trim and bleed blog post and below. With that in mind, be sure that any images you want to extend to the edge of the printed page, go all the way to the edge of your 8.5″ x 11″ PDF, filling the bleed area (again, 0.125″ top and bottom, 0.25″ on the outside edge).

3. Content is too close to the spine.
Another “edge” to keep in mind is the inside edge of your PDF, where the spine will be on your printed publication. We often see PDFs with text that starts right next to the spine, and becomes lost when printed with a perfect binding. As we described in our design series blog post on designing for perfect binding, up to 1/4 inch of the inside edge of your page may be lost into the spine on a perfect bound publication. It is important to keep this in mind when designing your PDF, and ensure that none of your content is placed close enough to the inside edge that it is in danger of being lost in the final print.

4. Images are distorted across perfect bound spines (especially faces).
In addition to text disappearing into a perfect bound spine, we also see PDFs that have images going across the center spine such that the resulting print appears to be missing up to a half inch in the center of the image due to the perfect binding. As described in our perfect binding blog post, as well as on our Getting Started page, this can be avoided by making the two halves of one image into two separate images within the document, then moving them both out from the spine slightly and duplicating the opposing image within the resulting gutter space. Another trick is to avoid placing the focus of an image on the spine, which will draw attention to this disappearing act and make it more obvious to the viewer. If the focus is moved away from the center spine, any loss of content into the spine area will be less noticeable.

5. PDF uses low resolution images.
While the placement of images is one thing that can cause problems in a print copy, the image itself can be the problem. We often see are PDFs that use lower resolution images, and although they look good on screen, they end up looking pixelated in print. As we describe in our design series blog post about getting the most out of your images, screen resolution is 72 pixels- or dots-per-inch (dpi) but print resolution is 300 dpi. Therefore, when selecting images for your publication, they should be at least 300 dpi to ensure a quality print out. As a test to see if your images will look good in print, open your PDF on your computer screen and zoom in to 300%. If the images still look crisp then, they will look good in your printed copy. On the other hand, if they look pixelated (like they are made up of little blocks of color) then your image is too low res, and will end up looking fuzzy in your final printed copy.

300 dpi vs 72 dpi at 350% zoom

6. Color profiles are not embedded.
Another common image problem we see in PDFs deals with the color of the resulting print copy. As we explained in our design series blog post on working with color, HP Indigo presses print MagCloud publications in a 4-color CMYK process, but most images that get used in the PDF have an RGB colorspace. To help guide this conversion from RGB to CMYK, it is important that the color profiles for these images are embedded in the PDF. Without them, the color of the printed images may appear to be slightly off. To make sure that you are using the best color settings possible when creating your PDF, we encourage you to follow the program-specific instructions that are available for download from the bottom of our Getting Started page.

7. Fonts are not embedded.
Of course, color profiles aren’t the only things that need to be embedded in your PDF – any fonts you use also should be included. A common error that occurs in our PDF upload validation is non-embeddded fonts. This can again be avoided by following the downloadable instructions on our Getting Started page for the software you are using to design your PDF. Each of these guides provides settings that will ensure your fonts are properly embedded in your final PDF, and help you avoid this upload error.

8. Fonts are too small or illegible.
In addition to the technical issue of non-embedded fonts, in some cases the problem with a PDF stems from the fonts themselves being too small or illegible, making the text difficult to read in the final print. For body copy we recommend 9-12 point type and for headlines 18 points or higher.  As we discussed in our design series blog post on typeface dos and don’ts, you also want to avoid hard-to-read fonts, particularly for large blocks of text. Decorative fonts are great as headers, but can detract from your message when they become difficult to read.

9. Dark text is used on a dark background, or light text is used on a light background.
Even in cases where the font is legible, we’ve seen PDFs where the color of the text doesn’t provide enough contrast with the background. Placing navy blue text on a black background or light yellow text on a white background, as shown below, becomes very difficult to read. When there is not enough contrast between the text and the background like this, the text seems to blend in and disappear from view, taking the message it was intended to convey with it.

10. A light spine is used with a dark cover, or a dark spine is used with a light cover.
Finally, while you want your text to stand out, it’s a whole other story when it comes to your spine. We occasionally see PDFs that have dark covers and light spines, or vice versa, which makes the slightest shift in the spine placement become glaringly obvious. As we discussed in our perfect binding design blog post, we encourage you to pick a spine color that is close to the color of your front and back covers. Doing so will give a more seamless appearance to your final print publication, and ensure a more polished look with every print.

To help avoid these problems in your PDF, be sure to follow the program-specific instructions available for download on our Getting Started page when designing your publication. For some more resources to help design your PDF, check out our design series blog post on layouts and templates, or browse through some of our featured publications on the MagCloud website for inspiration.

Does your publication successfully avoid these ten common problems? Share a link to it in the comments below!

Like a Rocket in the Sky: Propel Your Business to New Heights Using MagCloud

Let’s face it, being successful takes work. Today’s world is dramatically different from the one fifteen years ago–it’s a noisy place full of fierce competition. The stakes are high and greatness is always on the line. If you’re anything like us, you know the challenge to be seen and heard is one of the most difficult. So how do you set yourself apart? In the spirit of entrepreneurship, we suggest trying some of these creative ideas to promote your brand—and ensure you remain in the know for your industry:

Establish yourself as THE expert: Your brand collateral is the most important opportunity to talk about your product or service. That’s why so many businesses (The Costco Connection, USAA Magazine) and owners have found that branded magazines are a unique way to pique audience interest with relevant content and information. It keeps you top of mind in a format that gets to your customers or target audience more frequently—be it annually, quarterly or monthly. How does it work? Well, by presenting your business in an editorial format you can:

  • develop prospective customers and foster increased loyalty
  • establish your organization or company as current on issues and trends
  • be a resource for information that is relevant to your audience
  • give depth and relevance to your brand in an environment you can control

Don’t be shy, tell your story: A custom magazine (e.g. This Workplace) or brochure (e.g. HP 360°) is the perfect way to chronicle the history of your company, a new product’s road to market, and much more. Consider the story you want to tell, and record or detail aspects that support your narrative. And don’t forget to employ social media either! Use Pinterest to crowd source ideas from fans and customers, leverage Instagram to showcase behind-the-scenes elements, and engage in conversation with your target audience on Twitter.

Showcase your amazing career: Showcase your career accomplishments and accolades in a magazine (e.g. Subject Matter, Trendi Creative) including media coverage, photos of your work, testimonials and anything else you’d be proud to display. Present it to prospective clients and include a link to it in your resume.

Keep pace with industry news and trends: Sometimes it seems as if the world—and the people in it—are changing faster than anyone can keep track. Start by putting your finger on the pulse of the industry. Draw insights and inspiration easily, and stay abreast of current and expected trends that are relevant to your business by reviewing what others are doing in and around you (e.g. Spinr Magazine, XXC Magazine).

Say ‘I Do’ in DIY Style

Most couples will tell you the secret to a perfect wedding day lies in the details. Those personalized moments that make the occasion truly unique—especially DIY touches—are sure to create an intimate experience. Whether you’re planning a traditional soirée, or an affair that will color outside the lines of convention, consider these approaches to create lasting memories:

Wedding Guest Book

The wedding guest book is a perfect time capsule. Showcase your favorite photos and memories from over the years, capture guests’ well-wishes and preserve the occasion forever. It’s not only something you’ll cherish forever, it also makes for a beautiful addition to your ceremony and reception. MagCloud’s photo book format is perfect for the occasion. We also recommend checking out Blurb’s photo book options!

DIY Guest Gift

Share your love story with friends and loved ones in a beautifully unique, one-of-a-kind scrapbook using Flickr, and distribute it as part of the wedding gift. Simply gather your photos into an online photo album (take a peek at this post for tips!), then choose the photo set. Your photos will automatically be organized into a beautiful magazine format.

Unique Photo Album

Make your wedding photo album as unique as your wedding. A beautiful album will last a lifetime and ensure those endearing moments documented on film (or Instagram!) are around for generations to see. Regardless of whether you’re on a budget, or merely prefer a more hands-on approach, you have easy-to-use options at your fingertips. From MagCloud’s photo book format to Blurb’s BookSmart tool, you’ll get high quality prints that will last a lifetime.

As the wedding season heats up, we’d love to hear your creative planning ideas and how you’ve used MagCloud in aspects of your special day. Share in the comments below, or connect with us on Facebook and Twitter.

Recommended Reading

How to make a DIY Wedding Photo Guest Book

DIY Wedding Ideas using MagCloud

Adding MagCloud Touches to Your Wedding

Beyond the format—making a wedding book for them (and one just for you)

Hats Off to Dads and Grads

It goes without saying that June is an exciting time for most. Midway through the year, it signals the start of summer and encompasses both freedom for grads and family fun for dads. If you’re in the market for a unique way to celebrate either one, you can use MagCloud to do last-minute shopping for Dad or commemorate your grad’s past as they look toward the future.

Ideas to Brighten Dad’s Day:

Print and Digital Indie Magazines

If your dad happens to be a jack of all trades, chances are we have the mags to match. Whether he likes cars, technology, sports, or travel, we carry print and digital publications that make reading a more pleasant pastime.

carheader

Custom Recipe Book

You don’t get between a guy and his grill, unless you have a cookbook. Put together his go-to recipes in a custom recipe book. We have the perfect recipe for a successful cookbook, should you need it!


Great Gifts for Eager Grads:

photobook1Photobooks for Friends

Since the change that accompanies graduation can be bittersweet, you can create a photobook to commemorate the past years before your grad takes a step in their new direction. The MagCloud Digest product is perfect for displaying full color photographs in a compact layout.


Custom Thank You Notes

If you found yourself in a pile of celebratory send-off gifts, you can give thanks with custom thank you cards. Our single sheet Flyers in the smaller Digest size are printed on a cover stock that that fits  perfectly into A9 envelopes and makes them ideal for using as flat notecards. Get started with our Software-Specific Instruction Packages.

Print and Digital Portfolio

Much to our delight, some grads will be on the hunt for careers as artists, designers, writers and publishers. For those of you, MagCloud’s print-on-demand features include quality printed portfolios at an affordable price, with a variety of sizes and binding options and an optional number of copies. With our Ship to Group feature, you can even send copies of your portfolio directly to an address list of potential employers.


No matter what or whom you’re celebrating this summer, MagCloud wants to help you wish them a warm congratulations and a happy Father’s Day!


Recommended reading:

MagCloud for Graduation Memories

Let’s Give It Up For Our Dads

A Father’s Day photo book just for him

Celebrate their achievement with a graduation photo book